Monday, August 31, 2015

Bionic Bags

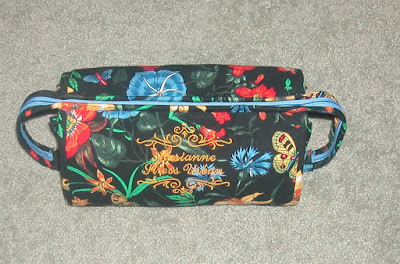
I've been doing something a little different the past few weeks. A friend of mine expressed an interest in the Bionic Bags that are currently popular, so I purchased the pattern and made one for her for her birthday. This is how it turned out.


I got enthusiastic about doing something a bit different, so I made a couple more bags, and added them to my Etsy site for sale:


I think that's it for me on the bags for a while. Now it's back to the quilts! LOL!

Happy Quilting!
Jean MaDan


Friday, July 17, 2015

Square Dancing Star

Let me start out by stating clearly that this is NOT my pattern! If you want this pattern, it's available (sort of) here:
Square Dancing Star
http://www.pineapplepresspatterns.com/html/our_patterns_3.html

I say "sort of", because I wasn't happy with the size for my own use, so I made it with larger pieces and then I also added borders. But it is a nice pattern, so don't let that stop you, if you're happy with the size they offer!! And no, I won't tell you details about how I changed it... that wouldn't be nice of me. *grin* But really, I'm serious, it IS a nice pattern!!

Now, they CLAIM that the center is an Ohio Star, but it sure doesn't look like any Ohio Star I've ever seen. LOL! So just ignore that Ohio Star name part... Square Dancing Star works just as well anyway! So..... on we go with my story of how my quilt came to be!!

Last March there was a very-big-deal-quilt-show in Lancaster, Pennsylvania. Now, I have never in my life gotten to attend anything like that, but my best quilting buddy DOES go, and I live vicariously through her, with daily emails flying back and forth. She also does a LOT of retail therapy when she is at these shows, and this year she required more than usual, as she's recovering from some major health setbacks. She is also the very definition of generous, and knowing that I was also going through some major "stuff" myself, she determined that I also needed to be on the retail therapy train. LOL! So she proceeded to buy a LOT of goodies for us BOTH! Among the MANY things that she purchased for me, was a quilt kit... THIS quilt kit. Because I wanted it larger, I added fabrics from my own stash, but other than that, it is much as it was intended to be. And I am thrilled with the end result. So... TA-DAH...... I present.....

Square Dancing Star


GO! With your jelly rolls!

Use your GO! cutter with your jelly roll strips to make HSTs fast, and still use up some of those strips that you just can't decide what to DO with!!


Okay... now be honest!! You have jelly roll strips that you just... don't.... LIKE! You liked 80% of the ones that came in the set, and there were some that just didn't float your boat. Am I right? If not, well... you're one lucky quilter! So, what do you do with those left over strips that you didn't like, and didn't use?? I decided to use mine to make Half-Square-Triangles. (HSTs). I can use those in scrappy quilts, and it won't matter that they aren't my favorite fabrics. I'm not going to bother to give you a pattern to use them in... there are a kajillion (a technical math amount *snicker*) patterns that use HSTs in them, and I'm sure you already have something in mind. What I'm going for in this tutorial is fast-and-easy... that's all. What you do with them is strictly up to YOU! So... here we GO!

Using your GO! cutter, and die #55063 (the one that cuts half square 2" finished  triangle multiples) cut out triangles FROM BACKGROUND FABRIC OF YOUR CHOICE. I decided to use white for all of my background, just for simplicity sake, but you can do whatever you like. I cut a good size stack of those before I start picking through my jelly roll strips.
Once I choose my first strip, I cut off the selvage and then cut it into 3¼" long sections, and add one of the background triangles to one corner.
Place right sides together, carefully matching corners. Sew ¼" from edge, as shown below.
Now add another triangle to the opposite corner.
Sew ¼" from edge as before.
Be sure to watch your corners and keep them straight.
Next your going to cut the two sections apart as shown below.
Trim off the rabbit ears (see black lines marked) and press open.
You now have two lovely HSTs ready to use in whatever project you want.
Continue in the same manner until you've used up your strip segments.

Happy Quilting!
Jean MaDan
Friday, July 3, 2015

Big Teal Stars

Hi Folks!!
Well, it has been quite a while since I've posted, I know. A lot has been happening in my world, and most of it hasn't been all that terrific. But I won't dwell on it here. Instead, I'm going to TRY to get back to posting quilts! This is one that I did to use some large teal and coral floral fabric that had been sitting on the shelf in my sewing room for a while. I don't normally use large prints (unless I cut them up VERY small) but lately I've been using them more in really big blocks.


I think it worked out well for this quilt.

Happy Quilting!
Jean MaDan

Monday, February 9, 2015

Never Say Never!

Well over a year ago I began hand stitching a Grandmother's Flower Garden quilt. Last July I posted my progress, telling you that I had managed to figure out a way to cover the top of the bed, and do a pillow tuck, but was determined NOT to do the remaining borders with appliqué as well. Well... never say never! LOL! As it turned out, I did indeed end up doing the remaining borders in appliqué! I'm soooooo relieved to finally have this quilt FINISHED! Hand stitched hexagons, hand appliqué work... both things I would have sworn I would never do. Wow... Never Say Never! 


Happy Quilting!
Jean MaDan

Sunday, January 18, 2015

Anatomy Of A New String Quilt

Anatomy Of A New String Quilt

A dear friend of mine recently got me to join a group called HeartStrings. They do a lot of charity quilts that specialize in quilts made with string blocks. Now, I've been doing that type of charity quilts for over 20 years, but I do my own sort... and what they do on the group were sort of "out of the box" for me. But I figured I would go through some of my patriotic fabrics and experiment a bit, and just see if I was happy with the results if I left my comfort zone a bit.

To start off, I'm going to be honest here... I was going to use up a few fabrics I wasn't totally crazy about. I figured if I didn't love the results, I could always incorporate the blocks into some scrappy string block quilts of another type. Plus, I wasn't as careful with the math for my center strips as I thought I was, and my 24 blocks turned out to only be 20, which didn't make as big a unit as I wanted, either, so that changed the game plan some as well! Anyway, here's how it went:

Using various strips of fabric from my stash, I made 20 blocks, trimmed to 9½"


Now, I know that block looks so busy that you wouldn't think it would make a decent looking quilt, but just bear with me! Here's what it looks like when you put together 5 rows of 4:


The problem is that this is just too small to be of much use! So, time to add some borders!


All in all, this turned out pretty decent looking for a quilt made completely from fabrics I wasn't really crazy about to start with! So now I'm sold on the HeartStrings ideas, and my next one I may actually even follow the rules and use some fabrics that I like. LOL!

Happy Quilting!
Jean MaDan