Monday, July 22, 2019

Arizona Memories

She's Baaaaaaack!!


Wow! It has been a long dry spell, hasn't it!?!

As some of you know, I was the full time care giver of my husband of close to 50 years, as he battled Alzheimer's. He passed away in April of 2017. Just a couple of months after that, I took a bad fall, which resulted in multiple injuries... the worst of which was massive nerve damage to my left arm and hand. For almost two years I couldn't even hold a piece of paper with my left hand. And the pain never stops. But I'm finally making some progress!! My thumb and first finger will work a bit now with determination, so of course the FIRST thing I'm using it for is QUILTING!!! So... I present my first quilt in over two years....

ARIZONA MEMORIES


Happy Quilting!!

Jean MaDan

Monday, August 31, 2015

Bionic Bags

I've been doing something a little different the past few weeks. A friend of mine expressed an interest in the Bionic Bags that are currently popular, so I purchased the pattern and made one for her for her birthday. This is how it turned out.


I got enthusiastic about doing something a bit different, so I made a couple more bags, and added them to my Etsy site for sale:


I think that's it for me on the bags for a while. Now it's back to the quilts! LOL!

Happy Quilting!
Jean MaDan


Friday, July 17, 2015

Square Dancing Star

Let me start out by stating clearly that this is NOT my pattern! If you want this pattern, it's available (sort of) here:
Square Dancing Star
http://www.pineapplepresspatterns.com/html/our_patterns_3.html

I say "sort of", because I wasn't happy with the size for my own use, so I made it with larger pieces and then I also added borders. But it is a nice pattern, so don't let that stop you, if you're happy with the size they offer!! And no, I won't tell you details about how I changed it... that wouldn't be nice of me. *grin* But really, I'm serious, it IS a nice pattern!!

Now, they CLAIM that the center is an Ohio Star, but it sure doesn't look like any Ohio Star I've ever seen. LOL! So just ignore that Ohio Star name part... Square Dancing Star works just as well anyway! So..... on we go with my story of how my quilt came to be!!

Last March there was a very-big-deal-quilt-show in Lancaster, Pennsylvania. Now, I have never in my life gotten to attend anything like that, but my best quilting buddy DOES go, and I live vicariously through her, with daily emails flying back and forth. She also does a LOT of retail therapy when she is at these shows, and this year she required more than usual, as she's recovering from some major health setbacks. She is also the very definition of generous, and knowing that I was also going through some major "stuff" myself, she determined that I also needed to be on the retail therapy train. LOL! So she proceeded to buy a LOT of goodies for us BOTH! Among the MANY things that she purchased for me, was a quilt kit... THIS quilt kit. Because I wanted it larger, I added fabrics from my own stash, but other than that, it is much as it was intended to be. And I am thrilled with the end result. So... TA-DAH...... I present.....

Square Dancing Star


GO! With your jelly rolls!

Use your GO! cutter with your jelly roll strips to make HSTs fast, and still use up some of those strips that you just can't decide what to DO with!!


Okay... now be honest!! You have jelly roll strips that you just... don't.... LIKE! You liked 80% of the ones that came in the set, and there were some that just didn't float your boat. Am I right? If not, well... you're one lucky quilter! So, what do you do with those left over strips that you didn't like, and didn't use?? I decided to use mine to make Half-Square-Triangles. (HSTs). I can use those in scrappy quilts, and it won't matter that they aren't my favorite fabrics. I'm not going to bother to give you a pattern to use them in... there are a kajillion (a technical math amount *snicker*) patterns that use HSTs in them, and I'm sure you already have something in mind. What I'm going for in this tutorial is fast-and-easy... that's all. What you do with them is strictly up to YOU! So... here we GO!

Using your GO! cutter, and die #55063 (the one that cuts half square 2" finished  triangle multiples) cut out triangles FROM BACKGROUND FABRIC OF YOUR CHOICE. I decided to use white for all of my background, just for simplicity sake, but you can do whatever you like. I cut a good size stack of those before I start picking through my jelly roll strips.
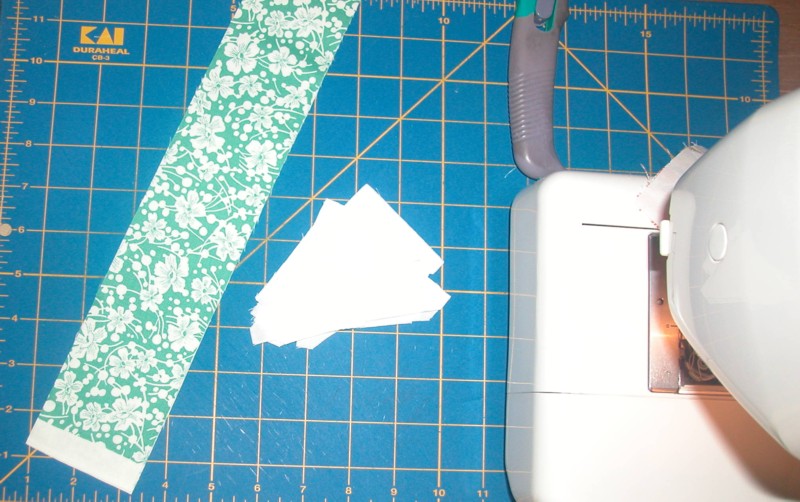
Once I choose my first strip, I cut off the selvage and then cut it into 3¼" long sections, and add one of the background triangles to one corner.
Place right sides together, carefully matching corners. Sew ¼" from edge, as shown below.
Now add another triangle to the opposite corner.
Sew ¼" from edge as before.
Be sure to watch your corners and keep them straight.
Next your going to cut the two sections apart as shown below.
Trim off the rabbit ears (see black lines marked) and press open.
You now have two lovely HSTs ready to use in whatever project you want.
Continue in the same manner until you've used up your strip segments.

Happy Quilting!
Jean MaDan

Friday, July 3, 2015

Big Teal Stars

Hi Folks!!
Well, it has been quite a while since I've posted, I know. A lot has been happening in my world, and most of it hasn't been all that terrific. But I won't dwell on it here. Instead, I'm going to TRY to get back to posting quilts! This is one that I did to use some large teal and coral floral fabric that had been sitting on the shelf in my sewing room for a while. I don't normally use large prints (unless I cut them up VERY small) but lately I've been using them more in really big blocks.


I think it worked out well for this quilt.

Happy Quilting!
Jean MaDan

Monday, February 9, 2015

Never Say Never!

Well over a year ago I began hand stitching a Grandmother's Flower Garden quilt. Last July I posted my progress, telling you that I had managed to figure out a way to cover the top of the bed, and do a pillow tuck, but was determined NOT to do the remaining borders with appliqué as well. Well... never say never! LOL! As it turned out, I did indeed end up doing the remaining borders in appliqué! I'm soooooo relieved to finally have this quilt FINISHED! Hand stitched hexagons, hand appliqué work... both things I would have sworn I would never do. Wow... Never Say Never! 


Happy Quilting!
Jean MaDan

Sunday, January 18, 2015

Anatomy Of A New String Quilt

Anatomy Of A New String Quilt

A dear friend of mine recently got me to join a group called HeartStrings. They do a lot of charity quilts that specialize in quilts made with string blocks. Now, I've been doing that type of charity quilts for over 20 years, but I do my own sort... and what they do on the group were sort of "out of the box" for me. But I figured I would go through some of my patriotic fabrics and experiment a bit, and just see if I was happy with the results if I left my comfort zone a bit.

To start off, I'm going to be honest here... I was going to use up a few fabrics I wasn't totally crazy about. I figured if I didn't love the results, I could always incorporate the blocks into some scrappy string block quilts of another type. Plus, I wasn't as careful with the math for my center strips as I thought I was, and my 24 blocks turned out to only be 20, which didn't make as big a unit as I wanted, either, so that changed the game plan some as well! Anyway, here's how it went:

Using various strips of fabric from my stash, I made 20 blocks, trimmed to 9½"


Now, I know that block looks so busy that you wouldn't think it would make a decent looking quilt, but just bear with me! Here's what it looks like when you put together 5 rows of 4:


The problem is that this is just too small to be of much use! So, time to add some borders!


All in all, this turned out pretty decent looking for a quilt made completely from fabrics I wasn't really crazy about to start with! So now I'm sold on the HeartStrings ideas, and my next one I may actually even follow the rules and use some fabrics that I like. LOL!

Happy Quilting!
Jean MaDan


Saturday, December 27, 2014

Quilts I did as Christmas Gifts

Fun for Christmas!
I have a granddaughter who is crazy for Minnie Mouse, and loves pink, so this is what I made for her for Christmas this year:


My other granddaughter is a bit older, and prefers blue, so she got this one:


My grandson, who will be attending college next year, got this:


All in all, it was a nice Christmas, and all of the grandkids were happy with their quilts! Hope you all had a joyous Christmas as well!

Happy Quilting!
Jean MaDan

Thursday, November 20, 2014

The season for giving

'Tis the season!


While so many of us are celebrating the holidays, I would like to take a moment to talk to you about a very special woman in my life... my beautiful niece Susan. Things haven't been easy for her, and yet she GLOWS with a beautiful spirit and showers the people around her with love. Her smile just lights up the room, and being around her makes your day just that much brighter.

When Susan was only 31 years old when she was put on oxygen and told she would need a lung transplant in order to survive. She was diagnosed with an extremely rare lung disease called Pulmonary Capillary Hemangiomatosis that caused shortness of breath and oxygen dependency and for which she was put on the lung transplant list. There was no cure for this disease so this was her only hope for survival. In January of 2005, she was admitted to the hospital to undergo the extensive surgery to attach the new set of lungs. Because of her amazing team of physicians, she was blessed with the opportunity to see the next 10 years of her two small children's lives. Milestones that included her son's kindergarten graduation and teaching her daughter how to drive a car.

Last year her mother, my friend since childhood, died of cancer, and this year her father, my beloved brother Jim, died of a sudden heart attack. Now, to top off all that grief, she finds that 
her second set of lungs are failing. She is again dependent on oxygen to survive and has been put back on the transplant list. She is, again, in desperate need of the funds necessary for the complex procedure and the extensive recovery of such a procedure.

Susan has many dreams in her life that are unfulfilled due to her lung disease. Her biggest dream now is to get her new lungs so she will be there for her children who desperately need her. If anyone ever deserved to have help with those dreams, it's Susan! There isn't a lot I can do for her, but here is what I thought might be feasible...

From now until Christmas, any and everything I sell on my Etsy site:

 (patterns or quilts), will go to help pay for those expenses. The same will be true for the embroidered quilt labels and quilting I'm doing for my few exclusive personal clients. 

Or, if you'd rather donate directly, please feel free to do so at the site set up for that purpose:


For those of you that don't like doing credit card type things online, and prefer doing things by check, email me directly, and I can work something out with you for patterns and/or quilts by regular mail by check for this purpose only. My email is:

Thank you all for your support and for your love through the years!
Happy Quilting!
Jean MaDan

Monday, October 27, 2014

Redwork Flowers And Stars

For this quilt I did a series of redwork flowers as the centers of my patchwork stars.
I've always like the old fashioned look of redwork, so I decided to use a background
fabric that reminded me of tea stained beige you see on some really old quilts. I
like the result here.


Sunday, October 26, 2014

Arizona Arrowheads

I finally got the hand stitching done on the binding for this quilt. That is the one chore I tend to procrastinate on. I'm not sure why... I'm fairly fast at it, and I do a lot of other kinds of hand work, but for some reason I just don't enjoy doing binding. But I DO enjoy seeing the finished results. So, anyway, here is my latest quilt...

Arizona Arrowheads

I made this one extra long, to use on the sofa or on a twin bed.
See.... even on my own original patterns, I don't always do them "by the numbers".
I like being able to vary things, making different sizes to meet my needs given
whatever uses might come to mind at the time. *grin*

Monday, October 6, 2014

Aaron's Quilt

Aaron's Quilt

I'm finally back in my sewing room after being out of the loop for a long while. I recently lost my beloved brother, and it was devastating for me. I didn't feel much like sewing or anything else. So here is my first finish... a quilt for a nephew that came over and helped me get some things done!


I chose to go with something that combined both contemporary and traditional elements. Aaron is a bachelor who likes blue. The gray background gives it a neutral look that should help it play well with whatever other design elements he has in his bedroom. This king size quilt should work well for his needs and age, I think. It's nice to be sewing again, and it was a joy to do something for family. 

Tuesday, July 8, 2014

Designing as I go along!

When You Run Out Of A Fabric....

Well over a year ago I decided I wanted to make an old fashioned hand pieced Grandmother's Flower Garden quilt. I decided I had PLENTY of a certain green fabric on hand that I would border each of my flowers with just that one, so I started on my merry way:

Best laid plans of mice and men, as Robert Burns would say! Yep... ran out of that green fabric! And did not have enough to do anything really the way I wanted, but had already put together my pieces in a way that didn't lend themselves to incorporating OTHER greens in with them. The moral of the story is don't sew your pieces together as you go along I guess. *sigh* I had a very large square quilt unit. Not a comfortable size for much of anything. Stuck, stuck, STUCK in a mire of my own making! So... I framed it, looked at it, looked at it some more, and put it aside for a while and brooded on it.


Now, there is a LOT of hand stitching going on there. I'm not willing to give up and call that a big old square sofa throw! (Brood, brood, brood, pout, pout, pout!) I'm also not willing to throw ten unrelated borders on the top and bottom to make it long enough to cover the top of my bed! (Brood, brood, brood, pout, pout, pout!)  I finally came up with an idea that I thought might work, even though it would normally be way outside of my wheelhouse.... appliqué! I don't do hand appliqué as a rule. I don't feel like I'm very good at it, so generally I stick to machine piecing. But this had so much hand work to begin with, I figure... why not? So... I decide to make a pillow tuck with appliqué work on it.


Not too bad for someone who doesn't do much of this sort of thing. So now I attach that to the body:


Ignore the ripples and wrinkles... it really does lay flat, I promise. I'm just having some trouble getting down to the floor this morning. LOL! 
So now all I have to do is design the side and end drops and I'll have a bed quilt again. I guess I'm back to the brood and pout stage until I come up with ideas for that, because I REFUSE to applique all of THAT! LOL! But at least I feel like all of that work wasn't wasted.

Happy Quilting!
Jean MaDan

Thursday, June 26, 2014

Log Cabin Goes Modern

Log Cabin Goes Modern

That's what I decided to call the finished quilt! LOL! Anyway, it's all done now! It's even already been put on my Etsy site for sale, and so has the pattern for those who would rather make their own! (You'll find a clickable link to my Etsy shop over to the right of your screen.) I decided on a modern geometric print for the backing. I kind of like the effect. What do you think?


Now I'm busy on my Grandmother's Flower Garden quilt again. I've gone as far as I can with that green fabric I had, so I'm now removing paper from what is done so far. It was enough to make a medallion type center that will cover the top of a queen size bed. Then I can add borders for the drop. I think that removing the paper is taking almost as much time as basting the paper in did to start with! It's turning into one of those "what was I thinking??" projects! Once all of that is done, and a border is put around that, I'll decide how I want to proceed on the rest of that quilt. I may just do the rest in appliqued hexie flowers... way easier!!

Happy quilting!
Jean MaDan

Sunday, June 22, 2014

New Top

I've been working on a new top this past week. This time I've put two old faithful blocks together... the log cabin, and the churn dash. This was the result:
 As you can see, I do tend to favor Kona black to offset all these scrappy colors. I think it really makes them pop! And so far all the men in my life that have seen them (now come on... I'm talking relatives here... be nice!) have really liked this one!

I really do need to get busy on the quilting side SOON! I'm building up quite a stack of tops in my sewing room that need attending to. I was waiting for a supply of batting to magically appear I guess. LOL! (What I had on hand got used up in my last round of soldier quilts.) But I just did a couple of baby quilts for a customer, and that put some funds back in the batting kitty, so hopefully this week I'll be able to get a few finishes done to show you guys. I really haven't been as indolent as my blog might imply lately! *wink*

Happy Quilting!
Jean MaDan

Friday, June 6, 2014

Other People's Strips

Other People's Strips

I've been working lately with my sister-in-law on scrappy quilts. She is... tentative... to say the least about venturing out on her own on them, though she loves them if OTHER people do them. She mentioned that maybe she just didn't have the right kind of scraps, because nothing she put together seemed to work. Then she got the idea of sending ME a box of scraps that she didn't want, to see if I would do something with them. Well, once I received the box, I sorted through them, and using nothing but her 1½" strips, and some Kona Black that she had put in the box, I started laying out some squares. The only part of the following quilt that came from MY sewing room was the multi-color sashing that I bought on clearance! And it didn't require much of that!


 For the backing, I cut 8" squares of various fabrics, and just made a multi-fabric reversible out of it.


A couple of the online groups I belong to have been addressing the subject of "stashbusting" older or unwanted fabrics in their collections. This might be a solution for some of them. Personally, I think this quilt turned out quite nicely, using fabric strips that my sister-in-law thought were not usable for anything more than string quilts at best. At least it's another option. And the backing is a way to use up some pieces that might not be enough to make a full coordinated quilt from, but do work as a nice patchwork effect. I like it better than a boring back, myself.

Happy Quilting!
Jean MaDan

Friday, February 21, 2014

Too many flimsies!

Oooops... UFOs in the making?

Usually when I start a project I tend to go start-to-finish on it. You know... design the quilt, make the blocks, put the top together, get it quilted, put the binding on, and the it's done and off my mind. But things have been a bit on the difficult side around here lately, with lots of interruptions, so I admit my powers of concentration are a bit on the ragged side. As a result, I have *gasp* FLIMSIES (tops that aren't quilted yet) on hand that need attention. They may wait a while, but here's what is ready to quilt:

 Red-work Stars is just a simple variable star pattern with an embroidered red-work flower in the center of each star. (My sister is a nut for embroidered flowers, AND for red-work, so this will make a great gift for her on her next visit.)

 Banded Logs was designed to use up those don't-match-anything black pieces of fabric scraps that were in my scraps. This seemed to work well, as the blacks blended away nicely into the brighter prints.

This Disappearing Pinwheel Churndash pattern from the Missouri Quilt Company, was just something I "had to try"... so I DID! Here's where to find it on Youtube: 

https://www.youtube.com/watch?v=zZUXNMpKF74

(I Hope the link works! If not, just go to youtube and type in disappearing pinwheel and you can find it.)

About this pattern... for you beginners, be aware in advance that this method puts all bias edges on the outside of your block. So, sew gently and try not to stretch it out of whack. And I, for one, advise immediately bordering the blocks in straight edge fabric if you want it to lay flat when you're putting rows together or quilting it. But, that's just me, and if you're an expert you may not have issues with that at all.

Oh... and that tutorial I did a few days ago... yep... it's still waiting to be quilted:

Now, since I figured I had enough tops laying around, I started cleaning up my sewing room and saw that my "string bin" was getting a bit out of hand again, even after doing the quilt shown above, so I knocked off 160 regular string blocks:
(16 stacks of 10)
So now my string bin is finally empty again! *whew* Mind you, that's just my strings, not my precisely measured strips, which are a whole-other-issue! LOL!

Now I'm sitting here realizing that I need to start quilting, when what I REALLY want to do is go start another quilt top. (Somebody smack my hands!) Preferably something really pretty and maybe even NOT SCRAPPY! But most of the designs in my head would involve shopping, so that isn't likely to happen right now. So... it's time to get inventive. I need to go shop the scraps and make a controlled scrappy that will do the same thing for me, right? Okay... I need to quilt first, and THEN go shop the scraps! *wink*

Happy Quilting!
Jean MaDan


Saturday, February 8, 2014

Stacked Blocks Tutorial

Stacked Blocks

A new free tutorial from Jean MaDan, using bonus HSTs and strings from your stash.


As most of you know, when I write tutorials, I like them to be SIMPLE, and use fabrics and tools that you are most likely to already have on hand. I like them even better if they are something that you wish you had a way to use up! *grin* I started doing this particular pattern about ten years ago when I got bored with regular string quilts and wanted to do something just a little different. So, I started fussing around with what I had in my stash, and this is what I came up with. I've done several of them over the years, and decided that some of you might want to play with your string collection and see what you come up with, so here are the basic steps.

First, you'll need to pick one solid color to use for a frame. I chose Kona Black, because I always have some in my stash, and every fabric shows up well against it. It helps tone down the chaos a bit as well. *wink* But you choose whatever you like. You'll need to cut that solid fabric into 1½" wide strips. (This is the only thing I'll be fussy about.)

Now gather up your bonus HSTs. Here's the good news... I don't care what size they are! Yep, that's what I said! I don't care! They can be 1½", they can be 2", whatever you have laying around. If you don't have any and want to make some, make them whatever size floats your boat! Plus, you can have some of each size and mix them all together into the same quilt. (Look at the photo above, and you'll see what I mean.) You're going to find this is the most I-don't-care tutorial you ever read! LOL!

Now you'll start framing your HSTs with the black strips:
 I can't really tell you how long to cut those pieces, because I don't know what size your HSTs are, because... yep... I don't care. *giggle* Okay, enough silliness. You got the point. So on with the lesson. 

Next you're going to start adding strings.. any width will do. Use narrow and wide and all sorts of colors. Just stick to ONE FABRIC per round as you go, so that you keep getting a sort of frame effect. Now, normally, I measure and cut my fabric before I add strips. I do that if I'm making log cabin blocks for example. But on this, because strings are so often a weird width, it's not practical. So, I cut it longer, sew it on, and trim off the excess.

Using the SAME FABRIC, add the next side:

Do this on all your squares, until they measure AT LEAST 5½" square. I usually go for slightly larger, and then square them neatly up like so:

NOW.... on EVERY OTHER SQUARE, you'll add an outside 1½" strip of black on one, and on the other square you'll do the same with a print fabric:


When they go into your rows, you'll rotate them so they form your pattern like so:

And when you put your rows together you get this:

Easy and fun, and you can use up weird sizes of HSTs, weird widths of strings, and you don't have to worry if the HSTs are facing the right direction or anything else. I like it! But then... I'm weird that way. *wink*

Happy Quilting!
Jean

Linda just sent me her finished quilt using this tutorial, so I wanted to share it with you!
 Beautiful job, Linda!!